Archive for the ‘Food’ Category
Peep Jelly Bean Easter Arrangement
Posted on: April 20, 2011
- In: Food
- Leave a Comment
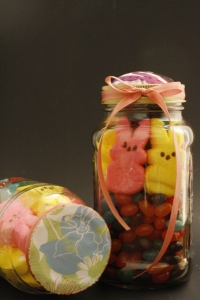
I saw this lovely Easter Peep Arrangement featured on Sugar Bee Crafts, it’s originally from The Autocrat. Haley came up with this great idea and created the arrangement in a vase. I wanted to do the same thing, but I wanted the peeps and candy to stay fresh and remain edible, so I opted to make mine on a smaller scale and put them in recycled mason and apple sauce jars.
This was a quick and adorable craft, inexpensive too if you find the candy on sale.
I made two, and since I had jar lids, I had to come up with a way to decorate them. For one I opted to cover the lid with some pastel scrapbook paper trimmed with fancy scissors to fit the lid top and wrapped the edge in ribbon. For the other I cut out a circle of fabric, stuffed it with a little polyfil and used a mason jar lid to layer the fabric and stuffing between the two layers, then tied lace around the jar lid.
I also used the Easter bunny peeps instead of the chick peeps because I felt they would fit in the smaller jar better. I think it turned out cute and am happy was able to take one to my WordPress guru in thanks for all the wonderful help!
Garden Gift
Posted on: March 30, 2011
- In: Food
- Leave a Comment
A while back a dear friend surprised me with a very special gift! I’ve been wanting to post about it for a while, but the days get away from me so easily.
This special gift including blooming daffodils is my very own starter garden and includes all kinds of wonderful vegetables and herbs. Sorry, I have no picture, it’s been dark out when I’ve been photographing, so I haven’t gotten a shot yet! Just picture a 16″ terracotta pot turned into a miniature vegetable garden including a small lattice piece for my snap peas to climb up and a splash of color with my daffodils!
I can already imagine how great my homegrown sugar snap peas, green onions, lettuce, spinach, parsley and rosemary will taste My cooking just got so much better! I made seafood on the half shell and was able to use my fresh parsley in the coating for the scallops, it was so yummy! I’m inspired to plant some additional vegetables too; I can’t wait until the harvest later this year!
Thank you my friend, I love my garden!
- In: Food
- Leave a Comment
Back In February Our Best Bites posted this delicious sounding recipe for Quick Brazilian Cheese Rolls {Pao de Queijo}. The recipe called for Tapioca Flour, which I’ve never used, or seen on the shelves in our local stores, so I had to go on a hunt to find the special flour. Success, thanks to Clark’s next to my work (how convenient!).
Then I had to go re-buy the cheese I’d got to make the recipe when I first discovered it. Cheese doesn’t last long in our house…
Finally, I could try my hand at making this Brazilian tasty!
It turns out that I didn’t read the recipe quite right. I filled the mini-muffin tins to the tippy top. (and right over the top) So I only got twelve rolls out of the recipe. But I could have easily made the 18 the recipe said I could, and bigger can be better right?
I also forgot to top the rolls with the parmesan cheese. Can you tell I was just too excited to get these made?
In spite of that, they turned out delicious. Well, if you’re me or the Fruit Ninja (aka my husband), but not so much if you’re the daughter.
I had them with dinner and then again for breakfast the next morning, and I have to say, I LOVED it as as breakfast item. I can absolutely picture them with sausage and eggs with salsa, oh yeah…Yum!
Tie Dye Cupcakes
Posted on: March 5, 2011
As promised back in January when I posted about Hippy Candy, I have created the Tie Dye Cupcake!
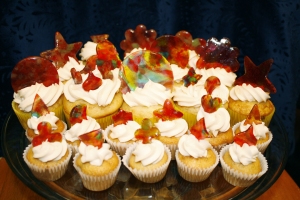
Using a cake mix from the store, I prepared the cupcakes according to the package directions. To go along with the multi-color tie dye feel, I opted to use the white mix with the color sprinkles mixed in, some places call it Funfetti, others Party Rainbow Chip.
I also cheated saved time and used the cream cheese frosting in a can from the grocery story and piped it on with the large tip to give it a little texture. (This was the first time I was able to get the tip to work as expected, it made frosting the cupcakes so fast and look that much more professional.)
(Sorry for the bad lighting in these pictures, it was dark by the time I
was ready to photograph and I don’t have a lot of good light it turns out.)
I used the same recipe to melt the candies for the toppers as i described in the Hippy Candy post. I used Jolly Rancher’s and I also tried Lifesavers. I made them thicker this time so they didn’t break when I was pulling them apart at the end. I only had one break this time, so I think that was the trick. The lifesavers taste great, but the candy does not melt as well and the colors are not quite right for the bright tie dye feeling. You could probably pick better selections of colors if you weren’t just using the multi-flavor bag with 60 candies in them. If you were doing a more natural affair and wanted muted colors, the lifesavers are definitely the way to go!
These cupcakes came together really quick, even with making the candy. One issue, I found was that I didn’t have enough cookie cutters to do two batches at once, so it did take a little longer than I’d hoped by having to wait for the candy to cool enough for me to reuse the cookie cutters. Oh! When you’re breaking the candy apart with your hammer, please make sure not to smash the tip of your finger instead of the candy. I can definitely say that I will making some variation of these again!
Daffodil Cupcakes
Posted on: February 9, 2011
My mom, loved daffodils. I didn’t recognize that enough while she was with us, I should have given her daffodil bouquets every chance I had. Now that she’s gone daffodils have become very special to me and every time they’re mentioned I take notice. Naturally, when I stumbled across a recipe for Daffodil Cake in the Potluck Club (Book 1) by Linda Evans Shepherd and Eva Marie Everson, I had to take note. This weekend was the 10 year anniversary of my mom (read the poem I wrote for her memorial) passing. In honor of her memory I decided to make these cupcakes for a dinner we were having with friends. My mom died from Huntington’s Disease, she was taken from me too soon, before I was old enough to realize what it means to be a mom and to be able to thank her for everything she did for me. There is no cure for Huntington’s Disease yet, but the scientists are working on finding a cure and saving other’s (perhaps my own daughter) from having to say goodbye too soon. Enough with the public service announcement, but if you want to know more, just leave me a comment or email me and I’ll be happy to share what I know.
 So, the Daffodil Cake is a lemon based pineapple cake with frosting topped with coconut. I find cupcakes are better for individual servings than cakes are, so when possible I make cupcakes instead of a cake. My only regret about changing up the recipe for this was that I missed the extra layer of frosting and coconut in the middle. I tend to have a problem with lemon cake, I seem to burn them more often than any other cake. This time was no different, but I did minimize the damage to only three of the cupcakes. The cakes were delicious, the frosting (made from a package which was basically an egg white base) was shiny and spread beautifully, but the coconut made the cake! (for me anyway) I thoroughly enjoyed them, and know my Mom would have loved them. I think I’ve found a special recipe to make whenever I need to have some time with my mom, thanks ladies from The Potluck Club for putting this idea in front of me!
Black Bean Soup
Posted on: January 31, 2011
- In: Food
- Leave a Comment
 Black beans seem to be the ingredient of the year so far… In October of 2010 the family took a trip to Myrtle Beach in South Carolina to attend the Long Course Triathlon Halfmax National Championship. (my husband competed and qualified for the World Championships!) While there we had the pleasure of fitting in some sight-seeing and we went to a small town called Conway to experience the traditional southern small town. We visited the cemetery, took a driving home tour and were able to see homes from the late 1800s, and we saw the largest and oldest oak trees I’ve ever seen in my life! They call them Live Oaks and they’re as impressive as the older homes. So while we were there we had to indulge in some fine southern food and found a place called The Trestle Cafe and my daughter ordered sandwich with black bean soup. Apparently it was the best black bean soup ever! I’ve tried two different recipes and neither one captured the flavor of that one. Tonight’s attempt was the Black Bean Soup recipe from the Our Best Bites blog. One thing I’m learning is that I LOVE
  black bean soup. Daughter may not be as happy as I am, but my taste buds are loving this new addition to our dinner options. To her credit, it’s not that she isn’t enjoying the soups, it’s just that none of them are the same as the one from The Trestle. I guess I’ll just have to keep trying!
Tonight’s recipe was delicious, the lime really made a nice touch, and although I liked the pureed version, my daughter prefers the chunky version. If you want a quick, easy and healthy dinner, I definitely recommend the black bean soup. We served it with corn bread and called it done. It was perfect! Thanks ladies from Our Best Bites!
Hippy Candy
Posted on: January 29, 2011
- In: Food
- 5 Comments
We’re planning a tie dye party in March so I’m starting to find ideas and get inspiration wherever possible. One of my favorite books is What’s New Cupcake?, my hubby got it last year for my birthday, and it has the cutest things in there! One of the things it has for Christmas is candy stars that you make out of melted jolly ranchers. I just knew I could use the same idea to come up some tie dye hippy candy. So today we broke out the jolly ranchers and the cookie cutters and set to work. All in all it only took us about 20 minutes to make the candy, you can’t beat that! You break the candy into small pieces, spread it out on a foil lined cookie tray, bake at 350 for 3-4 minutes until it melts, take it out of the 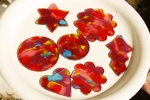 oven and use metal cookie cutters that have been coated in cooking spray to create shapes in the melted candy. Push the cookie cutters all the way in, as many as you can as close together as you can. Cool until it’s hard (stuck ours in the freezer to make it go faster) and then very carefully break off the edges that are not in cookie cutters and break apart all the cookie cutters and push the candy out if it gets stuck. Be very careful as you’ll end up with sharp edges and if the candy is thin in places it’s very fragile and break’s easily. But in the end we got about half a dozen beautiful stained glass candies and a bunch of extra pieces we can re-melt or just enjoy as is.
Here’s a close-up:
We’re on a scientific expedition around here, rumor has it that there is a new life form waiting to be discovered. An explorer was able to sketch a glimpse he caught, and now we’re on a search to be the first to find this new creature! He’s been dubbed an Ultra Terrestrial. Keep your eyes open!
- In: Food
- Leave a Comment
A while back my husband expressed interest in introducing more vegetarian dishes into our diet and leaning more toward becoming a pescatarian. So, being interested in cooking and willing to try new things I was excited about this new adventure. Problem being, I didn’t know where to start. Luckily for me, I was having my regular lunch date with a girl friend (my mentor at work and an all around amazing lady). She’s a vegetarian, so I knew she’d have something for me to try. She sent me a few recipes and I had to try one of them right away. It’s called Cottage Cheese Roast and it’s a vegetarian meat loaf. So I made the recipe, not sure how it was going to turn out, but totally game. I served it to the family and dug in. My first bite was a pleasant surprise, second bite was even better. I loved it! My family didn’t feel the same. (Why is that you find a recipe you love and no one else likes it?) I had to share the results with my friend, so I called her the next day and gave her an update. She said that her husband likes it even better the second day, just like meat loaf, he likes to make sandwiches out of it and eat it cold. I’ve never been one for that, but it gave me an idea to serve the leftovers as a dip with chips. My family loved that, go figure.
 It’s been months and I decided to try the recipe again, but this time, at the suggestion of my husband, I was going to stuff green bell peppers with the cottage cheese roast and bake it that way. I hate green bell peppers. So when I was shopping I got a green apple for me and green peppers for everyone else. Since it was a first for me, I stuffed the fruits and vegetables and then put the leftovers in a baking dish and baked it like the recipe calls for, so we would have both versions. When all was said and done, I still love it, and had to restrain myself! They liked it better, but no one went back for seconds. My daughter is looking forward to tomorrow and the leftovers with pita chips. So at least there’s that.
If you’re interested and want to try it, let me know and I’ll post the recipe, I highly recommend it, not that my opinion is popular around here!
Banana Cookies
Posted on: January 23, 2011
- In: Food
- Leave a Comment
 Today I was determined to make something with the three brown bananas I had before they were so brown that I couldn’t use them. I really didn’t want to make another loaf of banana bread or even banana muffins, so I did a Google search and found a yummy sounding recipe for Banana Cookies. The recipe was quick and easy to make, and it turned out a lot like muffin tops. I added in dark chocolate chips instead of pecans. Our stove tends to run a little on the cool side, so I had to bake them a little longer than the recipe called for, but once they turned golden brown I pulled them out and they were ready! We cooled them for a few minutes and couldn’t wait to dig in. I loved them, and have been telling myself not to go have another, because although they are banana, they are still cookies! The flavor was delicious, especially with the spices and the hint of chocolate every so often. I will definitely make these again, I think they’d be a great surprise to take at the holidays, or to a pot luck, something a little different and yummy! But most of all, I know have something else to do with brown bananas which I always seem to have come weekend!
- In: Food | Jewelry
- Leave a Comment
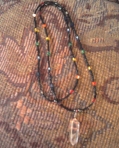
I’ve been wanting to make a nicer chain for my quartz crystal, but everything I’ve tried that was a true chain always ended up catching and breaking. I finally took inspiration from the rosary I have and combined that with the traditional colors for chakra’s so that I could easily have a way to focus my energies appropriately and came up with this. I threw in some hematite too, I’d heard it was good for healing. It’s more of a rainbow than I expected now that it’s all said and done, but I like it much better than the plain old black cord it was on. Since I just wear this chain at night to absorb the energy of the crystal I think it’ll be okay. I have no true knowledge of this stuff so I’m going on faith that if I believe it, it’ll work for me. And to some extent, it certainly has. I haven’t done much with the chakra’s themselves, but there are meditations in the book I have, and in the old days when I used to have trouble sleeping at night the meditations were extremely helpful to me and allowed to me relax and let go of the all the useless noise in my head that was keeping me awake. My hope is that by having the colors of the chakra’s represented in my necklace I will find a balance that I’m still seeking….
I had some broken jewelry lying around so since my tools out to make the chakra chain I went ahead and fixed all of them, so I got two of my most favorite necklaces back in action, and wore one of them to work today. 🙂 Two of them we inherited bought pieces and the one in the middle is one of the first necklaces I ever made. I really should do more with the small beads and seed beads, I end up liking those necklaces the most. I haven’t seen a lot of them out there, but then again, I’ve never intentionally looked for them, so maybe I could find a lot of inspiration if I just looked.
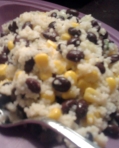
Last but not least, in any way, is the new Black Bean Couscous salad I made for dinner. Again it comes from one of my favorite cookbooks, Desperation Dinners. I have some staple recipes that I always use in the book but I was in the mood for something different so I stumbled across this one. The weather is unseasonably warm, over 80 today, so I was also trying to plan for some easy cooler recipes, as opposed to the warming comfort food I was making two weeks ago. So this one calls for couscous, black beans, corn, evoo, red wine vinegar, cumin, green onions, green bell peppers (I didn’t use them, I substituted extra corn), fresh lime juice, and salt and pepper to taste. I had a few issues with the couscous being overly watery, so I’ll have to figure out how to get it to cool down for the salad without soaking up that much water, and my daughter wished it had more flavor, so next time I think I’ll throw in a packet of taco seasoning to the water before I make the couscous. We served it with fresh avocado and pita chips (it called for blue corn chips, but we had the pita chips on hand) and it was a hit. I definitely think I’ll take this to the next potluck instead of the typical pasta salad. This one will be added to our easy summer hot night recipes list for sure. It was delicious and I can’t wait for leftovers tomorrow when I see how well the flavors melded together overnight. Yum!

